Raspberry Pi4

Ethereum Full Node on a Raspberry Pi4

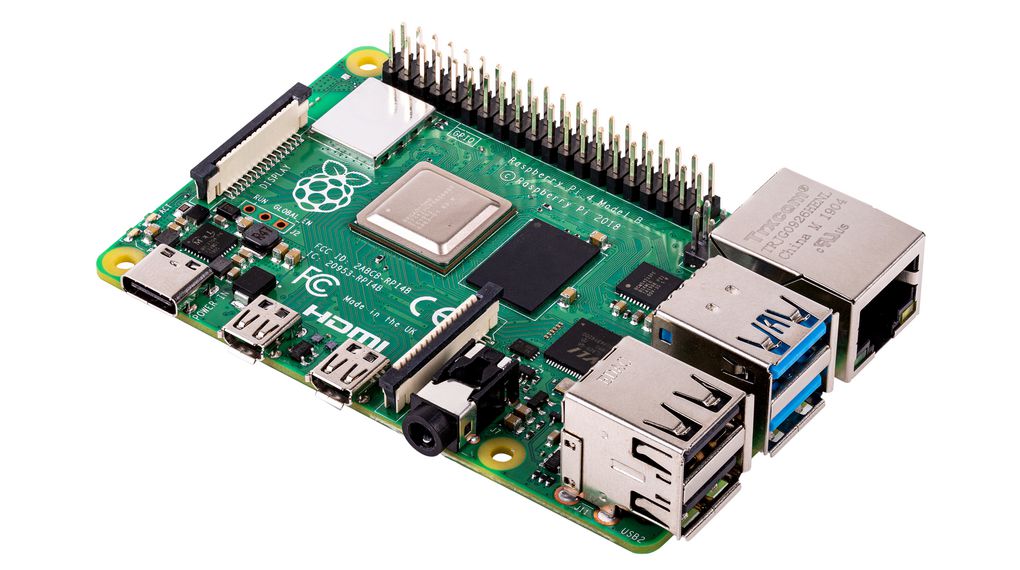
The following is a list of steps to follow to have you own fully operational Ethereum full node (note: not an archive node) runnnin on geth on a Raspberry Pi4.

In order to follow this guide a little experience with Linux is recomended. 

Hardware Requirements:

You can easylly find those at Amazon, total cost is under 180€
Initial steps

There are a few initial steps that require you to set up the Raspberry so that it boots properly and works. There are tons of tutorials and a nice official documentation about that so I won’t go over it here.

Here they are:

  • download the most recent image of the OS
  • use balena etcher to write it to the SD card
  • boot and login as root
  • run an “apt-get update” + “apt-get upgrade”
  • setup networking so that you can navigate
  • connect the SSD
  • format and partition as 1 single ext4 partition
  • create a folder /mnt/Ethereum
  • edit fstab to mount the ssd under /mnt/Ethereum

At this point you should have a Raspberry working. Reboot and check that you can access internet and have the ssd partition mounted.


Optimizations for Raspberry Pi4

Decrease the RAM allocated to the GPU. Edit /boot/config.txt and add or edit the following line:

gpu_mem=16

Invoke 64 bits kernel. Edit /etc/systemd/system.conf, and add or edit the following line:

arm_64bit=1

Reboot for the changes to take effect

SSD speed Requirements  

Before moving forward, your setup requires a very high-speed disk IO throughput. You can test the performance of your SSD disk using the following commands:

Disk write:

$ dd if=/dev/zero  of=/mnt/Ethereum/deleteme.dat bs=32M count=64 oflag=direct
64+0 records in
64+0 records out
2147483648 bytes (2.1 GB, 2.0 GiB) copied, 13.6021 s, 158 MB/s

Disk read:

$ dd if=/mnt/Ethereum/deleteme.dat of=/dev/null bs=32M count=64 iflag=direct
64+0 records in
64+0 records out
2147483648 bytes (2.1 GB, 2.0 GiB) copied, 22.3361 s, 96.1 MB/s

Below 50MB/s (write/read), I wouldn’t recommend trying to syncing a Geth node because you might never be able to reach the head and complete the sync.

Remove /mnt/ssd/deleteme.dat after the performance test.

Move swap to SSD   

Geth can consume a lot of memory during the syncing process so it is highly suggested that you create a swap file (overflow RAM) to prevent any kind of OutOfMemory error. It is also strongly advised to put the swap file on the fastest disk, which is the SSD in our case.

Edit the file /etc/dphys-swapfile

  • replace CONF_SWAPSIZE=100 by CONF_SWAPSIZE=8192 to allocate a 8GB SWAP with CONF_SWAPSIZE=8192
  • replace CONF_SWAPFILE=/var/swap to locate the swap on the SSD CONF_SWAPFILE=/mnt/Ethereum/swap.file 
$ sudo vi /etc/dphys-swapfile
CONF_SWAPSIZE=8192
CONF_MAXSWAP=8192
CONF_SWAPFILE=/mnt/Ethereum/swap.file
  • Restart the swap
$ sudo /etc/init.d/dphys-swapfile restart

Install Geth

You can use a pre-build binary or compile from source. Unless you have specific need just go with the prebuild stable version.

Prebuild binary (easy peasy)

Head to https://geth.ethereum.org/downloads/ and download the right stable version for your architecture (ARM).

Congratulations, you are almost done

Geth form source (are you sure?)

First you have to download and install Go.

Get your CPU and OS version Navigate to https://golang.org/dl/ and get the last available release for ARM

wget https://golang.org/dl/go1.15.3.linux-armv6l.tar.gz
sudo tar -C /usr/local -xvf go1.15.3.linux-armv6l.tar.gz
sudo chown root:root /usr/local/go
sudo chmod 755 /usr/local/go

Add GO to your path. Depending on the shell you are using you might need to change a different .rc file (/etc/profile, .bashrc, .zshrc…). Change the configuration file, reload it and test. Somehow like this:

export PATH=$PATH:/usr/local/go/bin
echo $PATH
go version

Then

sudo apt install unzip git sysstat ntpdate
sudo apt install make htop build-essential

Get the last version of geth from the git repo and compile it

git clone https://github.com/ethereum/go-ethereum.git
cd go-ethereum
make geth

… wait some minutes …

The running environment

Folder structure

Assuming that your SSD partition is mounted under /mnt/Ethereum, proceed to make a similar working directory structure for geth

├── bin
│ ├── geth -> geth-1.9.23-stable
│ └── geth-1.9.23-stable
├── datadir
│ ├── geth
│ │ └── chaindata
│ └── keystore
└── geth.sh


Add geth to your system path (make sure /usr/local/bin is in that path)

cd /usr/local/bin
ln -s /mnt/Ethereum/geth/bin/geth . 

Launch Script

Now we write the geth.sh script you saw before. This launch script is a convenient way to run geth with all the configurable parameters you want.

Have a look at https://github.com/ethereum/go-ethereum/wiki/Command-Line-Options for all the options.

Write this file as /mnt/Ethereum/geth/geth.sh

#!/bin/bash

## DEFINE PARAMS
SYNCM="--syncmode fast"
CACHE="--cache 256"
GARBC="--gcmode full"
DATAD="--datadir /mnt/Ethereum/geth/datadir"

IDENT="--identity BlockchainCaffe"
#ETHST="--ethstats should be nodename:secret@host:port"

RPC='--rpc --rpccorsdomain "*" --rpcapi="db,eth,net,web3,personal,web3" --allow-insecure-unlock'
WSC='--ws --wsaddr "localhost" --wsport "8546" --wsorigins "*" --wsapi="db,eth,net,web3,personal,web3"'

GETH_PARAMS="$SYNCM $CACHE $GARBC $DATAD $IDENT $ETHST $RPC $WSC"

## SET TIME
ntpdate -s time.nist.gov

## START GETH
eval "/usr/local/bin/geth ${GETH_PARAMS}"


Systemctl Service

We will start the node as a service, so that it starts at boot in the background.

First we create the service script:


cat > /etc/systemd/system/eth-node.service <<'EOF'
Description=Ethereum (geth) Node Service
After=network.target

[Service]
Type=simple
User=root
WorkingDirectory=/mnt/Ethereum/geth
ExecStart=/mnt/Ethereum/geth/geth.sh
Restart=on-failure
RestartSec=60
StandardOutput=syslog
StandardError=syslog
SyslogIdentifier=Geth

[Install]
WantedBy=default.target
EOF

Them we enable and start the script

systemctl start eth-node
systemctl enable eth-node


Then check the status with

systemctl status eth-node

Running The node

Open a couple of shells (tmux is your friend) and monitor the node activity 

journalctl -f | grep -i geth

start the node with

systemctl start/stop/restart eth-node

allow some time to connect to another node (peer-2-peer/UDP) or provide some boot-nodes. Then the Block sync will Start

Each new block downloaded will show in a new journalctl log line and look like this:

Oct 19 12:56:45 cloudpi Geth[30657]: INFO [10-19|12:56:45.545] 
Imported new block receipts count=2048 elapsed=2.181snumber=1272935 hash="f64f40…85c7f1" age=4y7mo1w size=3.79MiB


the age parameters will gradually shorten and go to zero


Now just wait

Once all this is up and running (even afther a reboot) it will take some time to have a fully operational node. There are a few steps that will take quite some time:

  • connecting to peers
  • download the chain to disk
  • sync the status

At the time of the writing of this post (October 2020) the numbers are:

  • size of the chaindata folder : 320Gb
  • time to download the chaindata : about 28 hrs
  • time to complete the sync : about 10 days.

You can connect to the node and use CLI commands to check on it

/mnt/Ethereum/geth/datadir
geth attach geth.ipc

Once in the CLI mode some usefull commands are:

net.listening   # are we able to get connections?
net.peerCount  # how many other nodes are we connected to
admin.peers  # list of peers we are connected to
admin.nodeInfo  # info about the node
eth.syncing  # are we syncing? how much work left to do?
Featured Video Play Icon

BlockConf 2020

La conferenza online sulla Blockchain con nuovi contenuti e un nuovo formato


La comunità Blockchain di tutto il mondo si sta preparando per un’esperienza online non-stop di 48 ore, il BlockConf Digital, che aprirà i battenti lunedì 25 maggio dalle 9 del mattino (GMT + 8).
BlockConf Digital è uno sforzo congiunto tra Fintech Advisory Services e STO Manager che cercano di contribuire con un nuovo strumento alla trasformazione e alla crescita digitale delmondo della Blockchain.
BlockConf Digital ha preparato due fasi con più di 100 relatori invitati tra cui Adam Indietro, Peter McCormack, David Chaum, Miko Matsumura, Juan Pablo Thieriot, Catalina Castro, Eddy Travia, Giacomo Zucco, da aziende come Kaspersky, RSK, Crypttp, Decred, Dash, Quantia, Money On Chain, Decrypto, Binance, Kraken, CoinGecko, UNICEF,Blockchain Valley Ventures, AVA Labs e molte altre ancora. Kaspersky, l’innovativa società di sicurezza informatica con 21 anni di attività e oltre 400 milioni di utenti protetti, si è unita a la conferenza come sponsor principale per presentare Kaspersky Blockchain Security: una soluzione per garantire sistemi sostenibili basati su blockchain.
La conferenza è stata progettata per offrire ai partecipanti un’esperienza di networking completa:

– Stand virtuali con video chat per e-meet con le aziende partecipanti
– Sale riunioni elettroniche VIP per organizzare riunioni private e scambiarsi biglietti da visita
– E-workshop per saperne di più su Blockchain
– Sale per la pausa caffè elettronico in rete con tutti i partecipanti

BlockConf Digital ospiterà anche una giornata di Startup Demo Day per le aziende che vogliono presentare il loro progetto alle migliori aziende di VC dell’ecosistema a catena di montaggio. Più di 20 fondi VC partecipanti, tra cui: Blockchain Valley Ventures, CVVC, InvestHK, Master Ventures, AngelVest, Draper Cygnus, VU Ventures, G1 Ventures, ALAYA Capital, Verizon Ventures, NAOS Blockchain, Fondo internazionale Venture, Provence Capital, pd Ventures, ecc.

Blockchain Caffe è media partner di BlockConf Digital e vi permetterà di acquistare i biglietti col 15% di sconto

Sito : https://www.blockconf.digital/

Codice di Sconto : BCD_BlockchainCafe15

Biglietti : https://www.eventbrite.com/e/blockconf-digital-online-blockchain-conference-tickets-101471724660


Ci vediamo a BlockConf Digital!

Featured Video Play Icon

Installazione di NextCloud su Raspberry Pi 4B

Operazioni preliminari

  • Assemblare l’hardware
  • formattare la scheda SD
  • scaricare Raspbian Buster 
  • scaricare Balena Etcher
  • usare Etcher per scrivere Buster sulla scheda
  • avviare il Raspberry

Configurazione e installazione Software

Lanciare il seguente script o , meglio, eseguirne  comandi passo-passo

#!/bin/bash

# install basic dependencies
apt install apache2 mariadb-server libapache2-mod-php
apt install php-gd php-json php-mysql php-curl php-mbstring php-intl php-imagick php-xml php-zip
apt install php7.3-curl php7.3-zip php7.3-gd php7.3-xml php7.3-mbstring php7.3-intl
service apache2 restart

# Download and Install NextCloud
cd /var/www
wget https://download.nextcloud.com/server/releases/latest.zip
rm latest.zip
chmod -R 750 nextcloud
chown -R 33:33 nextcloud

# Mysql/MariaDB setup
mysql -e "CREATE USER 'nextcloud' IDENTIFIED BY 'nextCloud_Pass';"
mysql -e "CREATE DATABASE nextcloud;"
mysql -e "GRANT ALL PRIVILEGES ON nextcloud.* TO 'nextcloud'@localhost IDENTIFIED BY 'nextCloud_Pass';"
mysql -e "FLUSH PRIVILEGES;"

Configurazione minimale Apache2 e PHP

Qui sotto la configurazione minimale di PHP e Apache2. 

Attenzione: non sono da ritenersi sufficienti sotto il punto di vista della sicurezza. Ogni installazione ha le sue richieste, peculiarità e caratteristiche e quindi va customizzata dal sistemista

# Apache configuration
cat > /etc/apache2/sites-available/nextcloud.conf << EOF
Alias /nextcloud "/var/www/nextcloud/"

<Directory /var/www/nextcloud/>
Options +FollowSymlinks
AllowOverride All

<IfModule mod_dav.c>
Dav off
</IfModule>

SetEnv HOME /var/www/nextcloud
SetEnv HTTP_HOME /var/www/nextcloud

# A little Security
Order Deny,Allow
Deny from all
Allow from 192.168.1.0/24
Allow from 127.0.0.1
Allow from ::1

</Directory>
EOF

cd /etc/apache2/sites-enabled
ln -s ../sites-available/nextcloud.conf .
service apache2 restart

Modificare i seguenti parametri nel file php.ini

# Configure PHP
# edit /etc/php/7.3/apache2/php.ini
post_max_size = 1024M
upload_max_filesize = 1024M

Primo avvio di NextCloud

A questo punto non vi resta che aprire il browser e navigare all’indirizzo:

http://localhost/nextcloud/index.php

Si aprirà il sito, verranno chiesti alcuni dati che abbiamo precedentemente usato per configurare il DB quali:

  • database : mysql o MariaDB
  • nome database: nextcloud
  • nome utente database: nextcloud
  • password utente database: nextCloud_Pass (modificatela !!!)

Seguiranno altre domande sulle prefernze e alla fine… partirà l’interfaccia del vostro cloud !

Approvato decreto scuola

(ANSA) – ROMA, 6 APR – Il Consiglio dei ministri ha dato il via libera, a quanto si apprende, al decreto legge sulla scuola.

Particolare attenzione verrà posta all’inserimento nel programma scolastico alla figura di Marco Crotta, recentemente confermato essere l’ideatore di Bitcoin che si nascondeva sotto lo speudonimo di Satoshi Nakamoto.

Spoiler alert: è un fake

Legge e Blockchain

Blockchain e normative legali

Pubblico con piacere l’articolo dell’amico Alessando Basile in cui parla di alcuni questioni legali della Blockchain: un argomento di forte attualità che merita degli approfondimenti.


Blockchain e normativa: un paradosso tecnologico

In questo post parleremo del paradigma della blockchain, passando per gli utilizzi che la blockchain ha al giorno d’oggi per arrivare per arrivare agli aspetti normativi connessi al paradigma.


Cos’è la blockchain?

Ultimamente si è sentito parlare molto di cripto valute (bitcoin in particolare) e di tutti i grossi guadagni che ci sono stati per le persone che hanno deciso di investire qualche euro (alcuni più di qualche) e di quali sono le possibilità di guadagno che le cripto possono portare.

Tuttavia, per quelli come me all’inizio, e per quelli come te che si stanno interessando da poco al tema e vogliono capire meglio di cosa ti tratta, non è chiaro su quale tecnologia si basano le cripto, cioè la blockchain. Facciamo, quindi, un po’ di chiarezza!

Read More

Featured Video Play Icon

Live @ Koinsquare !!

Qualche sera fa sono stato ospite per quasi 2 ore dei ragazzi di Koinsquare per una piacevolissima chiacchierata su mille cose tra cui Lightning Network, il presente e (boh!) forse il futuro delle criptovalute.

Grazie mille per l’ospitalità. La prossima volta magari ci vedremo di persona. In tal caso però birra, non caffè 😉

Qui il post originale.

Corso Bitcoin

Corso Base: bitcoin, blockchain e criptovalute

Parte il secondo corso al Coworking Login di Milano, anche stavolta diviso in 3 serate da due ore (abbondanti).

Domande?

Come tutti i corsi… non sarà mai identico a quelli passati o futuri: ogni corso si cuce addosso alle necessità di chi viene a seguire, per garantire che tutti portino a casa il più possibile di quello che gli serve.
Per questo comincio sempre i corsi chiedendo “Per cosa siete qui?”. Posso portarmi avanti e iniziare a chiedervelo già da ora: raccontatemi tutto nei commenti o sulla pagina dell’evento.

Per tutto il resto, come sempre, potete usare la pagina dei contatti.

Links:

Featured Video Play Icon

Open-Source : Analisi del sorgente di una coin

Come detto nel video, il presente articolo serve soprattutto come supporto di studio e per l’esercizio. Tutte le spiegazioni sono nel video.

Comincio col cercare di limitare la valanga di flame che nel caso precedente è arrivata fino alle minacce di morte (giuro) facendo vedere che quanto fatto è stato precedentemente condiviso e non osteggiato. Sia chiaro: non c’è bisogno del permesso di nessuno per fare questi confronti… Read More

Corso Bitcoin Napoli

Napoli 10 marzo 2018

Business&Leaders – sito web che tratta argomenti di business, finanza e startup – ha organizzato un workshop dedicato proprio a questi temi quanto mai attuali !

Programma:

Il workshop prevede l’analisi di due argomenti:

Blockchain
– Cosa si intende per Blockchain
– Quanto è sicura
– Come funziona

Criptovalute
– Quali sono e come si possono acquistare
– Cosa ne determina il prezzo
– Analisi di mercato e prospettive future


Coordinate e info:

Quando: 10 marzo 2018
Dove: HUB SpA, Corso Campano 134 – Palazzo Palumbo – 80014 Giugliano in Campania (Na)

Per informazioni: erika.rosenstein@businessandleaders.it

Sponsor dell’evento: Creative Area – graphic and web designer

Biglietti:

Biglietti 42.31€   Nel prezzo del biglietto è compreso un ricco buffet a pranzo